Networking, Security & Cloud Knowledge

Showing posts with label Wireless. Show all posts

Saturday, October 26, 2024

Wireless Networking Cheat Sheet

Wireless Networking Cheat Sheet


Wireless Standards


- 802.11a: 5 GHz, up to 54 Mbps, shorter range.
- 802.11b: 2.4 GHz, up to 11 Mbps, longer range.
- 802.11g: 2.4 GHz, up to 54 Mbps, backward compatible with 802.11b.
- 802.11n: 2.4/5 GHz, up to 600 Mbps, uses MIMO technology.
- 802.11ac: 5 GHz, up to 3.46 Gbps, wider channels and MU-MIMO.
- 802.11ax (Wi-Fi 6): 2.4/5 GHz, higher efficiency and capacity.

Common Wireless Terms

- SSID: Service Set Identifier, the name of the wireless network.
- BSSID: Basic Service Set Identifier, the MAC address of the access point.
- WPA/WPA2/WPA3: Security protocols for wireless networks.
- Channel: The frequency used for communication, often overlapping in the 2.4 GHz band.
- MIMO: Multiple Input Multiple Output, technology that uses multiple antennas to improve performance.

Wireless Security Protocols

- WEP: Wired Equivalent Privacy, outdated and insecure.
- WPA: Wi-Fi Protected Access, improved security over WEP.
- WPA2: Enhanced security, uses AES encryption.
- WPA3: Latest security protocol, offers stronger encryption and protection against brute-force attacks.

Wireless Configuration Commands (Windows)

- Show available Wi-Fi networks:
  netsh wlan show networks

- Connect to a Wi-Fi network:
  netsh wlan connect name=""

- Disconnect from a Wi-Fi network:
  netsh wlan disconnect

Wireless Troubleshooting Commands

- Ping the access point:
  ping 

- Check signal strength:
  netsh wlan show interfaces

- View wireless network properties:
  netsh wlan show profile "" key=clear

Common Wireless Issues

- Weak signal: Check distance from the access point, obstacles, and interference.
- Connection drops: Update drivers, check for interference, and signal strength.
- No internet access: Verify DHCP settings, check ISP connection, and router status.

Best Practices for Wireless Networking

- Use WPA3 for better security.
- Select less crowded channels (1, 6, 11 in 2.4 GHz).
- Position access points centrally to optimize coverage.
- Limit SSID broadcasting for sensitive networks.
- Regularly update firmware on access points and routers.

Wednesday, December 26, 2012

Wireless AP role


Understanding Access point role.

Table 1 Role and Association Matrix

Root Access Point
Root Bridge (without Wireless Clients)
Non-root Bridge
Non-root Bridge with Wireless Clients
Workgroup Bridge
Root Access Point


X
Root Bridge


X
X
X
Non-root Bridge without Wireless Clients

X

X

Non-root Bridge with Wireless Clients

X
X


Workgroup Bridge
X
X


Universal Workgroup Bridge
X
X


Access Point Role:

·         In the access point role the router accepts associations from wireless clients and non-root devices, such as a non-root bridge

Root Access Point: If the access point provides its clients a connection to a wired network through a wired connection it is said to be a root access point.

·         A device in root mode accepts associations with non-root devices, such as a non-root bridge.


Bridge Role

Wireless bridges provide higher data rates and superior throughput for data-intensive and line of sight applications. High-speed links between the wireless bridges deliver throughput that is many times faster than the E1/T1 lines for a fraction of the cost. In this way, wireless bridges eliminate the need for expensive leased lines and fiber-optic cables.

The wireless bridge can link LANs either through the wired interface or through the wireless interface.

Wireless bridges can be configured for point-to-point and point-to-multipoint applications.


Root Bridge: The station-role root bridge mode accepts associations with non-root bridge devices and can be set to

accept wireless clients. For example:

wd(config)#interface dot11radio interfacenumber

wd(config-in)#station-role root bridge wireless-clients

Friday, February 17, 2012

026- Converting Lightweight AP to Autonomous AP

To convert  LWAP mode to autonomous mode by loading a Cisco IOS release using a TFTP server:


Step 1 Setup your PC
  • Install TFTP server on you PC. 
  • Assign static ip from following pool 10.0.0.2 to 10.0.0.3. 
  • Ensure file extension are visible. From Windows Explorer, click Tools > Folder Options > View; then uncheck the Hide extensions for known file types check box.


Step 2: Downloading  IOS image
  • Copy access point image file (such as c1200-k9w7-tar.122-15.JA.tar for a 1200 series access point) in the TFTP server folder and activate TFTP. Set the timeout value on the TFTP server to 30 seconds.
  • Rename the access point image file in the TFTP server folder to  
    • c1200-k9w7-tar.default for a 1200 series access point,  
    • c1130-k9w7-tar.default for an 1130 series access point,  
    • c1240-k9w7-tar.default for a 1240 series access point, and  
    • c1250-k9w7-tar.default for a 1250 series access point.


Step 3: Uploading IOS
  • Disconnect power from the access point.
  • Connect the PC to the access point using a Crossover cable.
  • Press and hold MODE while you reconnect power to the access point. Keep holding the MODE button until the status LED turns red (approximately 20 to 30 seconds) and then release.
  • Wait until the access point reboots, as indicated by all LEDs turning green followed by the Status LED blinking green.


Step 4: Configure Autonomous AP
  •  After the access point reboots, reconfigure it using the GUI or the CLI.


 [Previous Post]    Networking Mnemonics

    Wednesday, December 14, 2011

    023- Converting Autonomous AP to Lightweight Cisco


    Upgrading IOS on Cisco AIR AP

    METHOD I: Using GUI
    • Open a browser and type http: // ip address of AP 
      • On home page click SYSTEM SOFTWARE, select SOFTWARE UPGRADE
      • you will get two option namely
        • HTTP upgrade
        • TFTP upgrade
      • For TFTP upgrade, enter TFTP server ip address, specify the name of IOS file name, click UPGRADE button. This show status window and will take up few minute. AP will reboot once the upgrade is completed.


    METHOD 2: Using CLI
      • Login into AP using Telnet / SSH or Hyper terminal
      • Type following commands : If you want to overwrite existing image
        archive download-sw /overwrite /reload  tftp:  / /location/image-name

        eg.archive download-sw /overwrite /reload  tftp : / /10.10.10.10 / c1240-k9w7-tar.124-10b.JA3.tar
    OR
    Type following command: If you want to keep existig ios
    archive download-sw /leave-old-sw /reload tftp://location/image-name

       
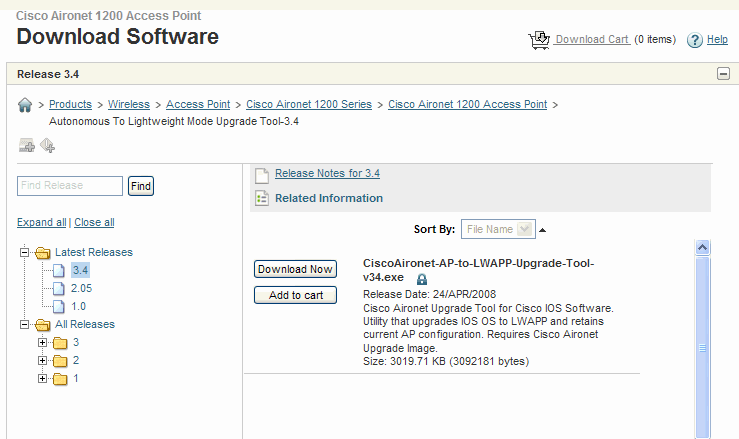
    METHOD 3:Using CiscoAironet-AP-to-LWAPP-upgrade-tool


      Steps to UPGRADING authnomous AP to Lightweight AP
      [ For AP MODEL : AIR-AP1231G-A-K9]
      • Before upgrade make sure that domain name [say xyz. Com] and dns server is entered in AP.
      • ping cisco-lwapp-controller.xyx.com
      • Create text file with following text
      [ip-address-of-ap],[login-name],[login-password],[Privilege-mode-password]


      • Open Upgrade Tool v3.4


      Details to be filled in Upgrade tool:
      1. give the path of IP File
      2. select radio use upgrade tool TFTP server
      3. provide the path of LWAP image
      C:\ Program Files\Cisco Systems\Upgrade Tool\images\c1200-rcvk9w8-tar.123-7.JX9.tar
      4. System IP Addr: IP address of host where Upgrade tool is installed
      5. Controller Details: specify ip address, login details of primary controller
      6. Add DNS address and domain name
      7. Click START


      • Once image is downloaded successfuly AP will reboot and link to the Primary controller.
      • Login in to controller and search for AP under Wireless TAB. It might register with mac address.
      • Edit the details of AP such as ip address, hostname, county code in WLC


      NOTE: to link light weigh ap to WLC we can use following command on AP

      AP# lwapp ap ip address [IP address] [subnet mask]
      AP# lwapp ap ip default-gateway [IP-address]
      AP# lwapp ap controller ip address [IP-address]
      AP# lwapp ap [hostname name]


      To clear the manually entered controller information, use following commands:
      clear lwapp ap ip address
      clear lwapp ip default-gateway
      clear lwapp controller ip address
      clear lwapp ap hostname


       To reset AP manualy to default
       clear lwapp private-config


      Sunday, June 26, 2011

      016 Configuring cisco 1300 wireless device

      Configuring 1300 as Non-Root Bridge

      This examples sets a LEAP user name and passsword for the SSID test:
           bridge# configure terminal
           bridge(config)# configure interface dot1radio0
           bridge(config)# station role non-root
           bridge(config)# ssid test

      Following command configure username and password for Leap authentication:
           bridge(config-ssid)# authentication client username admin password p@ssw0rd
           bridge(config-ssid)# end

      -------------------------------------------------------------------------
      Following command enable the local radius server on the bridge and ensure that local radius
      server is used for authentication


            bridge(config)#aaa new-model
            bridge(config)# aaa group server radius rad_eap server 10.10.10.10 auth-port 1812 acct-port 1813
            bridge(config)# aaa authentication login esp_methods group rad_eap

            bridge(config)# station role root
            bridge(config)# distance 1

      following command enters the bridge into the local server config mode:
            bridge(config)# radius-server local

      By default LEAP, EAPFAST, & MAC authentication are supported. Using the no form for other 2 types
      ensures that LEAP is used for authentication.

              bridge(config)# no authentication eapfast
              bridge(config)# no authentication mac

              bridge(config)# interface dot11radio 0
              bridge(config-if) # ssid bridge

      Following command enable EAP authentication for the SSID
             bridge(config-if-ssid)# authentication network-eap rad_eap

      This step is optional. This value seeds the initial key for use with broadcast [255.255.255.255] traffic.
      If more than one VLAN is used, then keys must be set for each VLAN,

            bridge(config-if)# encryption vlan 1 key 1 size 128bit 1234567890123456789 transmit-

      This defines the policy for the use of Wired Equivalent Privacy (WEP). If more than one VLAN is used,
      the policy must be set to mandatory for each VLAN.
            
                bridge(config-if )# encryption vlan 1  mode wep mandatory
       
                bridge(config)# user admin password p@ssw0rd