Networking, Security & Cloud Knowledge

Monday, December 26, 2011

022- DHCP

DHCP( Dynamic Host Configuration Protocol ) 
  • DHCP  is a network configuration protocol for hosts on Internet Protocol (IP) networks, It used to configure IP ADDRESS, Default Gateway, Prefix, DNS and other information into client.
  • DHCP was first defined as a standards protocol (RFC 1531 in October 1993, modified version  in 1997 RFC 2131 ), as an enhancement to the BOOTP (Bootstrap Protocol, RFC 951).
  • BOOTP required manual intervention to add configuration information for each client, and did not provide a mechanism for reclaiming IP addresses.
  •  The BOOTP protocol itself was first defined in as a replacement for the Reverse Address Resolution Protocol (RARP). The primary reason  for replacing RARP with BOOTP was that RARP was a data link layer protocol. Which introduced difficulties in  implementation on many server platforms, and required that a server be present on each individual network link.
  • BOOTP introduced the innovation of a relay agent, which allowed the forwarding of BOOTP packets off the local network using standard IP routing, thus one central BOOTP server could serve hosts on many IP subnets.
  • DHCPv6  (RFC 3315) added a DHCPv6 mechanism for prefix delegation. DHCPv6 ( RFC 3633) was further extended to provide configuration information to clients configured using stateless address autoconfiguration in RFC 3736.
  • DHCP & BOOTP uses the two ports assigned by IANA
    • Destination UDP port 67 for sending data to the server, and 
    • UDP port 68 for data to the client.
  • DHCP operations is fours step process: 
    • IP discovery, 
    • IP lease offer, 
    • IP request, and
    • IP lease acknowledgement.
NOTE: Initially DHCP clients and servers on the same subnet communicate via UDP broadcasts.Whereas Clients requesting renewal of an existing lease may communicate directly via UDP unicast, since the client already has an valid IP address at that point.


After the client obtains an IP address, the client may use the Address Resolution Protocol (ARP) to prevent IP conflicts caused by overlapping address pools of DHCP servers. Here special type of ping packet is used called as Gratuitous ping.

Other information exchanged using DHCP  


DHCP information 

The client may also request repeat data for a particular application. For example, browsers use DHCP Inform to obtain web proxy settings via WPAD. Such queries do not cause the DHCP server to refresh the IP expiry time in its database.


DHCP releasing The client can sends a request to the DHCP server to release the DHCP information and the client deactivates its IP address.


Client configuration parameters in DHCP
A DHCP server can provide optional configuration parameters to the client. RFC 2132 describes the available DHCP options defined by Internet Assigned Numbers Authority (IANA) - DHCP and BOOTP PARAMETERS.

A DHCP client can select, manipulate and overwrite parameters provided by a DHCP server.


Options An option exists to identify the vendor and functionality of a DHCP client. DHCP client can communicate to the server that it is using a certain type of hardware or firmware is to set a value in its DHCP requests called the Vendor Class Identifier (VCI) (Option 60). Which allows a DHCP server to differentiate between the two kinds of client machines and process the requests from the two types of modems appropriately. The value set using this option give the DHCP server a hint about any required extra information that this client needs in a DHCP response.


Wednesday, December 14, 2011

023- Converting Autonomous AP to Lightweight Cisco


Upgrading IOS on Cisco AIR AP

METHOD I: Using GUI
  • Open a browser and type http: // ip address of AP 
    • On home page click SYSTEM SOFTWARE, select SOFTWARE UPGRADE
    • you will get two option namely
      • HTTP upgrade
      • TFTP upgrade
    • For TFTP upgrade, enter TFTP server ip address, specify the name of IOS file name, click UPGRADE button. This show status window and will take up few minute. AP will reboot once the upgrade is completed.


METHOD 2: Using CLI
    • Login into AP using Telnet / SSH or Hyper terminal
    • Type following commands : If you want to overwrite existing image
      archive download-sw /overwrite /reload  tftp:  / /location/image-name

      eg.archive download-sw /overwrite /reload  tftp : / /10.10.10.10 / c1240-k9w7-tar.124-10b.JA3.tar
OR
Type following command: If you want to keep existig ios
archive download-sw /leave-old-sw /reload tftp://location/image-name

   
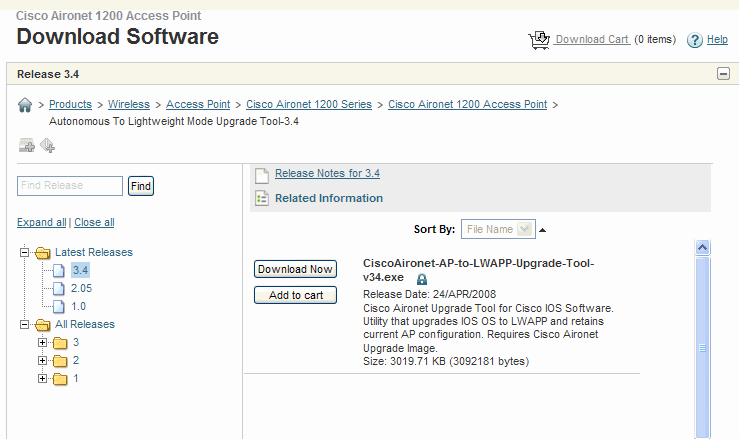
METHOD 3:Using CiscoAironet-AP-to-LWAPP-upgrade-tool


    Steps to UPGRADING authnomous AP to Lightweight AP
    [ For AP MODEL : AIR-AP1231G-A-K9]
    • Before upgrade make sure that domain name [say xyz. Com] and dns server is entered in AP.
    • ping cisco-lwapp-controller.xyx.com
    • Create text file with following text
    [ip-address-of-ap],[login-name],[login-password],[Privilege-mode-password]


    • Open Upgrade Tool v3.4


    Details to be filled in Upgrade tool:
    1. give the path of IP File
    2. select radio use upgrade tool TFTP server
    3. provide the path of LWAP image
    C:\ Program Files\Cisco Systems\Upgrade Tool\images\c1200-rcvk9w8-tar.123-7.JX9.tar
    4. System IP Addr: IP address of host where Upgrade tool is installed
    5. Controller Details: specify ip address, login details of primary controller
    6. Add DNS address and domain name
    7. Click START


    • Once image is downloaded successfuly AP will reboot and link to the Primary controller.
    • Login in to controller and search for AP under Wireless TAB. It might register with mac address.
    • Edit the details of AP such as ip address, hostname, county code in WLC


    NOTE: to link light weigh ap to WLC we can use following command on AP

    AP# lwapp ap ip address [IP address] [subnet mask]
    AP# lwapp ap ip default-gateway [IP-address]
    AP# lwapp ap controller ip address [IP-address]
    AP# lwapp ap [hostname name]


    To clear the manually entered controller information, use following commands:
    clear lwapp ap ip address
    clear lwapp ip default-gateway
    clear lwapp controller ip address
    clear lwapp ap hostname


     To reset AP manualy to default
     clear lwapp private-config


    Tuesday, June 28, 2011

    [ Topics ]

    For all the topic list in this site please click below.

    >>> CLICK HERE <<<

    021- IP SLA boolean


    ---------------------------------------------------------------------------------------------------------
    hostname R1
    !
    interface FastEthernet0/0
     ip address 10.10.10.1 255.255.255.0
    ----------------------------------------------------------

    hostname R2
    !
    interface FastEthernet0/0
     ip address 20.20.20.1 255.255.255.0
     ---------------------------------------------------------


    hostname R3
    !
    interface FastEthernet0/0
     ip address 10.10.10.2 255.255.255.0
    !
    interface FastEthernet0/1
     ip address 20.20.20.2 255.255.255.0
    !
    !
    ip sla 1
     icmp-echo 10.10.10.1
     frequency 10
    ip sla schedule 1 life forever start-time now
    !
    ip sla 2
     icmp-echo 20.20.20.1
     frequency 10
    ip sla schedule 2 life forever start-time now
    !
    track 1 rtr 1 reachability
    !
    track 2 rtr 2 reachability
    !
    track 3 list boolean and
     object 1
     object 2
    !
    ------------------------------------------------------------------------------------------
    R3#sh ip sla statistics

    Round Trip Time (RTT) for       Index 1
            Latest RTT: 144 milliseconds
    Latest operation start time: *00:18:35.835 UTC Fri Mar 1 2002
    Latest operation return code: OK
    Number of successes: 30
    Number of failures: 50
    Operation time to live: Forever


    Round Trip Time (RTT) for       Index 2
            Latest RTT: 100 milliseconds
    Latest operation start time: *00:18:30.851 UTC Fri Mar 1 2002
    Latest operation return code: OK
    Number of successes: 75
    Number of failures: 1
    Operation time to live: Forever
    -----------------------------------------------------------------------------------------------
    R3#sh track 1
    Track 1
      Response Time Reporter 1 reachability
      Reachability is Up
        3 changes, last change 00:00:26
      Latest operation return code: OK
      Latest RTT (millisecs) 144
      Tracked by:
         Track-list 3
    ----------------------------------------------------------------------------
    R3#sh trac 2
    Track 2
      Response Time Reporter 2 reachability
      Reachability is Up
        1 change, last change 00:10:12
      Latest operation return code: OK
      Latest RTT (millisecs) 108
      Tracked by:
        Track-list 3
    ----------------------------------------------------------------------
    R3#sh trac 3
    Track 3
      List boolean and
      Boolean AND is Up
        4 changes, last change 00:00:42
        object 1 Up
        object 2 Up

    Sunday, June 26, 2011

    020 IP SLA Tracking

    IP SLA based tracking.

    Router(config) # ip sla 1
    Router(config-ip-sla) # icmp-echo Y.Y.Y.Y
    Router(config-ip-sla-echo) # frequency 10
    Router(config-ip-sla-echo) # timeout 7000
    Router(config-ip-sla-echo) # threshold 5000

    Router(config) # ip sla schedule 1 life forever start-time now

    Router(config) # track 2 rtr 1

    Router(config) # interface GigabitEthernet0/0
    Router(config-if) #  standby 1 ip x.x.x.x
    Router(config-if) #  standby 1 priority 125
    Router(config-if) #  standby 1 preempt
    Router(config-if) #  standby 1 track 2 decrement 50


    Note:
    • IP SLA probes simulate specific types of traffic & send it to a receiver, called as a responder.
    • Y.Y.Y.Y = ip address of responder
    • Timers
    1.      Frequency: (Unit: Sec)
    2.      Timeout: maximum time required for SLA operation to complete. (Unit: mSec)
    3.      Threshold: Time to activate a response to IP SLA violation (Unit: mSec)

    Frequency > Timeout > Threshold.


    Commands for troubleshooting

    Router# sh ip sla configuration
    IP SLAs Infrastructure Engine-II
    Entry number: 1
    Owner:
    Tag:
    Type of operation to perform: icmp-echo
    Target address/Source address: Y.Y.Y.Y/0.0.0.0
    Operation timeout (milliseconds): 7000
    Type Of Service parameters: 0x0
    Vrf Name:
    Request size (ARR data portion): 28
    Verify data: No
    Schedule:
       Operation frequency (seconds): 10  (not considered if randomly scheduled)
       Next Scheduled Start Time: Start Time already passed
       Group Scheduled : FALSE
       Randomly Scheduled : FALSE
       Life (seconds): Forever
       Entry Ageout (seconds): never
       Recurring (Starting Everyday): FALSE
       Status of entry (SNMP RowStatus): Active
    Threshold (milliseconds): 5000
    Distribution Statistics:
       Number of statistic hours kept: 2
       Number of statistic distribution buckets kept: 1
       Statistic distribution interval (milliseconds): 4294967295
    History Statistics:
       Number of history Lives kept: 0
       Number of history Buckets kept: 15
       History Filter Type: None
    Enhanced History:
    ----------------------------------------------------------------------------------------------------------------------

    Router # sh track 2
    Track 2
      Response Time Reporter 1 state
      State is Up
        91 changes, last change 3d00h
      Latest operation return code: OK
      Latest RTT (millisecs) 36
      Tracked by:
        HSRP GigabitEthernet0/0 1
    ------------------------------------------------------------------------------------------------------------------------

    Router #sh ip sla statistics

    Round Trip Time (RTT) for       Index 1
            Latest RTT: 44 milliseconds
    Latest operation start time: 09:27:30.566 gmt Thu May 12 2011
    Latest operation return code: OK
    Number of successes: 159
    Number of failures: 0
    Operation time to live: Forever

    018- IP SLA based Tracking for HSRP

    Device detail:

    R3 = Primary ISP R4 = Secondary ISP
    R1 = Primary WAN router R2 = Secondary WAN router
    R5 = Host

    • R3 and R4 advertises subnet 200.200.200.200/32 and 100.100.0.0/16 (summary for 100.100.10.1, 100.100.20.1, 100.100.30.1) to R1 and R2 respectively.
    • AS path prepanding is configured on R2 for advertised route from R4, so that R3 is preferred over R4 for all outgoing traffic.

    Objective:
    Configure PBR on R1 so that traffic destined to only 100.100.20.1 subnet is sent to R4 via R2 only if R4 is reachable.


    Configuration on R1
    !
    ip route 20.20.20.2 255.255.255.255 192.168.1.3
    !
    ip sla 1
    icmp-echo 20.20.20.2 << ip address of R4 (backup isp)
    threshold 200
    frequency 5
    !
    ip sla schedule 1 life forever start-time now
    !
    track 3 rtr 1 << track 3 mapped to ipsla 1
    !
    route-map test permit 10
    match ip address 101
    set ip next-hop verify-availability 192.168.1.3 1 track 3 << conditional set command


    Configuration on R2
    !
    ip route 100.100.20.0 255.255.255.0 20.20.20.2

    019- Private Vlan

    Step 1: Setting device to VTP TRANSPARENT mode

    Switch(config)# vtp mode transparent

    Step 2: Creating VLANs [Secondary vlans / Private Vlan]
    vlan 101 = isolated vlan
    vlan 102 = community vlan

    Primary vlans (Secondary VLANs are associate to primary VLANs)
    vlan 100 = primary vlan

    Switch(config)# vlan 101
    Switch(config-vlan)# private-vlan isolated

    Switch(config)# vlan 102
    Switch(config-vlan)# private-vlan community

    Switch(config)# vlan 100
    Switch(config-vlan)# private-vlan primary
    Switch(config-vlan)# private-vlan association 101,102


    Step 3: Assigning port to vlan
    Port Fa0/1 = Promiscuous ( For Router / Firewalls)
    Port Fa0/3, Fa0/5, Fa0/6 = Host Ports ( For Hosts)

    Switch(config)# interface f0/1
    Switch(config-if)# switchport mode private-vlan promiscuous
    Switch(config-if)# switchport private-vlan mapping 100 add 101 102

    Our two server ports will be configured in host mode:
    Switch(config)# interface f0/3
    Switch(config-if)# switchport mode private-vlan host
    Switch(config-if)# switchport private-vlan host-association 100 101

    Switch(config-if)# interface f0/5
    Switch(config-if)# switchport mode private-vlan host
    Switch(config-if)# switchport private-vlan host-association 100 102

    Switch(config-if)# interface f0/6
    Switch(config-if)# switchport mode private-vlan host
    Switch(config-if)# switchport private-vlan host-association 100 102

    017 MPLS configuration on Cisco ios

    router(config)# ip vrp


    ================================================
    router(config-vrf)# rd

    RD format ASN:nn 16 bit: 32 bit
    ip:nn 32 bit: 16 bit
    --------------------------------------------------

    router(config-vrf)# route-target export
    router(config-vrf)# route-target import
    router(config-vrf)# route-target both

    Note:in case where the export and import RTs are same

    RT is in same format as RDs
    ==================================================
    ip cef

    interface fa0/0
    ip vrf forwarding

    Note: existing ip is removed once we configure vrf interface config command. so it has to be added again.
    --------------------------------------
    PE router
    for internet routing

    router bgp


    for vpnv4
    address-family vpnv4


    for CE-PE
    address-family ipv4 vrp < vrf-name>
    ---------------------------------------

    for MP-BGP PE-PE router

    router bgp
    neighbor remote-as
    neighbor update-source

    address-family vpn4
    neighbor activate

    neighbor send-community [extened both]

    no bgp default ipv4 unicast > to stop ipv4 bgp

    016 Configuring cisco 1300 wireless device

    Configuring 1300 as Non-Root Bridge

    This examples sets a LEAP user name and passsword for the SSID test:
         bridge# configure terminal
         bridge(config)# configure interface dot1radio0
         bridge(config)# station role non-root
         bridge(config)# ssid test

    Following command configure username and password for Leap authentication:
         bridge(config-ssid)# authentication client username admin password p@ssw0rd
         bridge(config-ssid)# end

    -------------------------------------------------------------------------
    Following command enable the local radius server on the bridge and ensure that local radius
    server is used for authentication


          bridge(config)#aaa new-model
          bridge(config)# aaa group server radius rad_eap server 10.10.10.10 auth-port 1812 acct-port 1813
          bridge(config)# aaa authentication login esp_methods group rad_eap

          bridge(config)# station role root
          bridge(config)# distance 1

    following command enters the bridge into the local server config mode:
          bridge(config)# radius-server local

    By default LEAP, EAPFAST, & MAC authentication are supported. Using the no form for other 2 types
    ensures that LEAP is used for authentication.

            bridge(config)# no authentication eapfast
            bridge(config)# no authentication mac

            bridge(config)# interface dot11radio 0
            bridge(config-if) # ssid bridge

    Following command enable EAP authentication for the SSID
           bridge(config-if-ssid)# authentication network-eap rad_eap

    This step is optional. This value seeds the initial key for use with broadcast [255.255.255.255] traffic.
    If more than one VLAN is used, then keys must be set for each VLAN,

          bridge(config-if)# encryption vlan 1 key 1 size 128bit 1234567890123456789 transmit-

    This defines the policy for the use of Wired Equivalent Privacy (WEP). If more than one VLAN is used,
    the policy must be set to mandatory for each VLAN.
          
              bridge(config-if )# encryption vlan 1  mode wep mandatory
     
              bridge(config)# user admin password p@ssw0rd


    015 Cisco IOS naming standard


    Cisco IOS naming format.


    HARDWARE:
    The first part is quite self explanatory, hardware is the hardware supported by the IOS.

    FEATURE SET:
    • This is where you can find out the features supported by the IOS.
    • the new naming convention of Cisco IOS uses word e.g. Entbase,advipserive etc, some older version still use letters to describe the features.
    • The "Legacy naming convention" can be quite confusing as compared to new naming convention.
    • Cisco distributes IOS packages according their features as show in diagram below.

    Note: The higher the features set, the more features it has. You can check the features of Cisco IOS image with the tool provided by Cisco.
    Access the tool at cisco site, and you can search by features, IOS image name, platform, product code, and you can even compare features between images.


    For the legacy naming convention, you can find it formated as yyyy, where the y can be replaced by the following letters:
    • b - For Apple talk support
    • c - For CommServer lite (CiscoPro)
    • g - For ISDN subset (SNMP, IP, Bridging, ISDN, PPP, IPX, and AppleTalk)
    • i - For IP sebset (SNMP, IP, Bridging, WAN, Remote Node, and Terminal Services)
    • n - For IPX support
    • q - For asynchronous support
    • t - For Telco return (12.0)
    • y - For reduced IP (SNMP, IP RIP/IGRP/EIGRP, Bridging, ISDN, and PPP)
    • (c1003 or c1004)
    • z - For managed modems
    • 40 - For 40 bit encryption
    • 50 - For 50 bit encryption

    MEMORY LOCATION and COMPRESSION FORMAT
    This section tells you from which memory location the IOS and what format of compression it uses. Check the following for the formats:
    • f - flash
    • m - RAM
    • r - ROM
    • l - the image will be relocated at run time

    And these are the compression types:
    • z - zip compression
    • x - mzip compression
    • w - “STAC” compression


    MAINTENANCE RELEASE and INDIVIDUAL RELEASE
    These shows the release version number of the IOS image.

    RELEASE
    The last part shows whether the image is T Release (new feature release identifier), S (individual release), or XR (modular packages).
     
    You need also consider the amount of DRAM of the device. The higher the version and features of an IOS, the more DRAM you need.

    K9 is the software feature code.
    The K means "kitchen sink" (enterprise for high−end) (same as BX). Not used after Cisco IOS Software Release 10.3
    K9 -Greater than 64−bit encryption. On Cisco IOS Software Release 12.2 and up.

    There is a Safe Harbour release for each of the products which is essentially a Cisco validated release.  Below is the link:

    Safe Harbour Release

    IOS Release Naming
    http://www.cisco.com/en/US/products/sw/iosswrel/ps1818/products_tech_note09186a0080101cda.shtml


    014 BGP soft-reconfiguaration


    BGP soft reconfiguration inbound
        Whenever we do some changes in the BGP policy, the BGP session has to be cleared for the new policy to take effect. Clearing a BGP session causes cache invalidation and results in a tremendous impact on the operation of networks.
         Soft reconfiguration allows policies to be configured and activated without clearing the BGP session. Soft reconfiguration can be done on a per-neighbor basis.
        There are two types of soft reconfiguration
    1. inbound soft reconfiguration
    2. outbound soft reconfiguration
    Inbound soft reconfiguration:
    • Soft reconfiguration can be used to generate inbound updates from a neighbor.
    • Performing inbound reconfiguration enables the new inbound policy to take effect.
    • In order to generate new inbound updates without resetting the BGP session, the local BGP speaker should store all the received updates without modification, regardless of whether it is accepted or denied by the current inbound policy. This is memory intensive.
    • To allow inbound reconfiguration, BGP should be configured to store all received updates.
    Outbound soft reconfiguration:
    • Soft reconfiguration can be used to send a new set of updates to a neighbor.
    • Performing outbound reconfiguration causes the new local outbound policy take effect without resetting the BGP session. As a new set of updates is sent during outbound policy reconfiguration, a new inbound policy of the neighbor can also take effect.
    • Outbound soft reconfiguration does not have any memory overhead. One could trigger an outbound reconfiguration in the other side of the BGP session to make the new inbound policy take effect. Outbound reconfiguration does not require pre-configuration.


    If you specify a BGP peer group by using the peer-group-name argument, all members of the peer group will inherit the characteristic configured with this command.

    BGP Peer – Soft Reconfiguration
    Router(config-router)# neighbor X.X.X.X soft-reconfiguration inbound
    • Use to configure BGP soft configuration.
    • Use this command in router configuration mode.
    • The X.X.X.X stands for ip-address.
    Verification
    show ip bgp neighbor X.X.X.X received-routes
    • Use to display all received routes (both accepted and rejected) from the specified neighbor.
    • Displays information only about IPv4 address-family sessions unless the all keyword is entered.
    • Prefix activity is displayed based on the number of prefixes that are advertised and withdrawn.
    • Policy denials display the number of routes that were advertised but then ignored based the function or